Ladybug Nail Ideas: A Playful, Polished Manicure for Every Nail Length
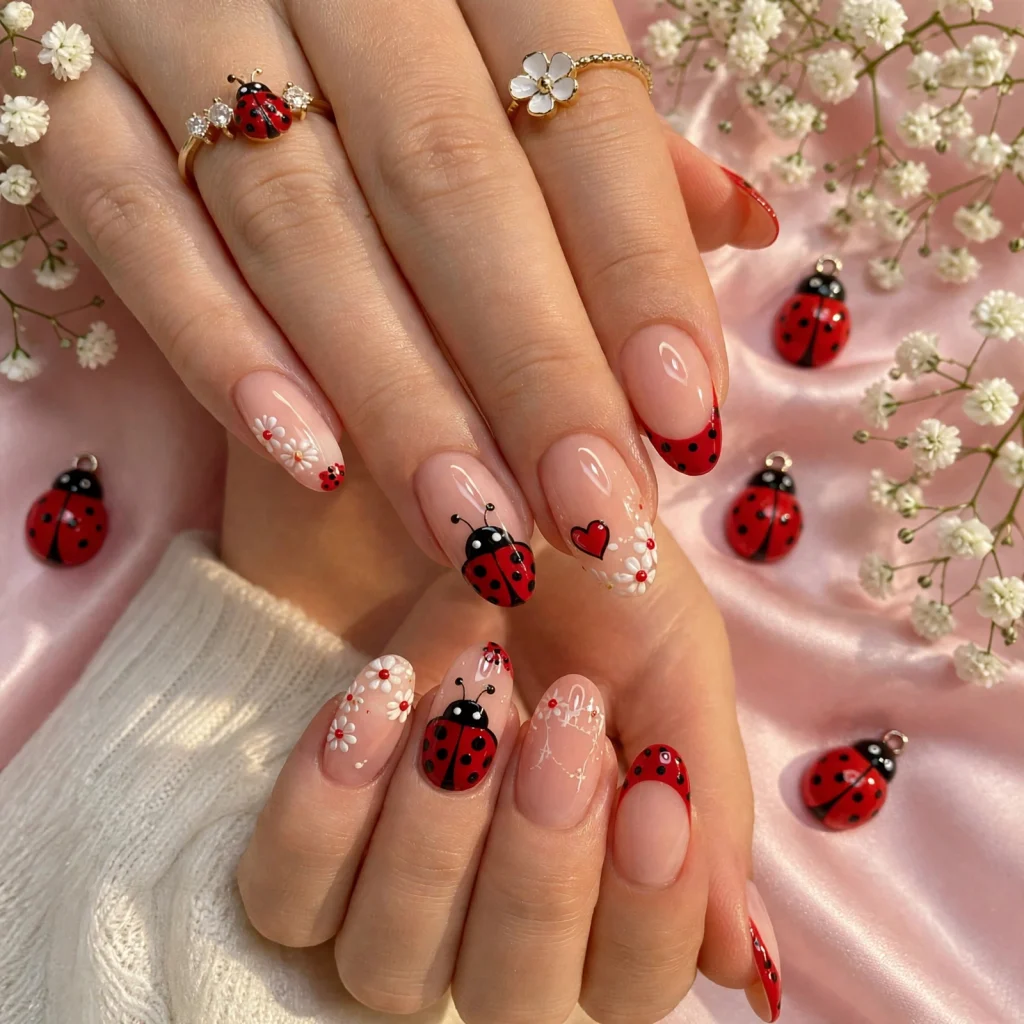
Ladybug nail ideas are having a fresh beauty moment because they combine something playful with something surprisingly wearable. The classic red, black, and white palette is instantly recognizable, but modern versions can look much more refined than the cartoon-style ladybug manicures many people remember.
From a nail artist’s perspective, the key is balance. A ladybug manicure looks most polished when the design has breathing room, the dots are carefully scaled to the nail length, and the red shade complements the wearer’s skin tone. You do not need ten heavily decorated nails to make the theme noticeable.
That makes this style especially appealing for clients who want seasonal, nature-inspired, or cheerful nail art without committing to an overly complicated manicure.
Ladybug nails also fit naturally into current manicure trends. Playful nail art remains strong in 2026, while tiny dots and short-nail designs are being used in more refined, fashion-forward ways. Polka dots in particular have returned as a noticeable manicure trend, which makes the signature dotted ladybug pattern feel especially current.
Why Ladybug Nail Ideas Feel Fresh Right Now
Ladybug nail art sits somewhere between nostalgic and modern.
Traditional versions usually feature bright red polish, large black dots, cartoon faces, and fully painted ladybug bodies. Those designs can still be fun, especially for themed events, but salon clients increasingly ask for cleaner interpretations.
Instead of covering every nail with detailed artwork, I would usually recommend choosing one strong ladybug feature and letting the remaining nails support it.
For example, a manicure can combine:
- glossy red nails
- tiny black micro-dots
- one ladybug accent nail
- a sheer nude base
- fine black detailing
- a micro-French tip
- subtle white highlights
That approach keeps the manicure visually playful without making it feel overly busy.
Red is also one of the most dependable manicure colors. Current nail coverage continues to show it working across glossy, jelly, minimalist, French, and decorative finishes, making it easy to adapt the ladybug theme to different personal styles.
The Modern Ladybug Color Palette
The obvious starting point is classic red and black, but the exact shades make a significant difference.
Classic Cherry Red
A clean cherry or candy-apple red creates the most recognizable ladybug effect.
This works beautifully on fair, medium, olive, and deep complexions, although I usually adjust the undertone slightly for each client.
Cooler blue-red shades tend to complement cool or rosy undertones, while warmer tomato and coral reds can look particularly flattering against golden, warm, and olive skin.
Deep Red
Burgundy, cherry wine, or muted crimson gives ladybug nail art a more sophisticated personality.
This is an excellent choice for someone who likes the motif but does not want the manicure to look overly youthful.
Sheer Nude
Using a sheer pink, beige, or milky base underneath small ladybug details makes the manicure much more minimal.
It is also practical because natural growth near the cuticle tends to be less obvious.
Black
Black should normally be used as an accent rather than the dominant color unless you specifically want a dramatic look.
Tiny dots, antennae, French tips, or delicate outlines often create a cleaner result than large areas of solid black.
White
A very small amount of white can add definition around eyes, highlights, or graphic details.
I prefer using it sparingly because too much white can quickly shift the manicure toward a cartoon aesthetic.
Practical Ladybug Nails vs. Statement Ladybug Nails
Before choosing the artwork, consider how you actually use your hands.
A practical manicure might use a short natural nail with one small ladybug accent and simple dots across two or three additional nails.
A statement manicure might involve sculpted almond extensions, detailed insects, raised gel droplets, chrome accents, or hand-painted foliage.
Both can look beautiful, but they behave differently in everyday life.
Someone typing throughout the day, handling children, working in healthcare, regularly opening packaging, or doing frequent household tasks may be happier with short, smooth nail art.
A client preparing for a photoshoot, holiday, festival, special dinner, or creative event might enjoy something more elaborate.
As a nail artist, I always prefer matching the complexity of the manicure to the client’s routine rather than choosing a design purely because it photographs well.
Ladybug Nail Design Idea
Glossy Red Micro-Dot Ladybug Accent Nails
For the most wearable interpretation of Ladybug Nail Ideas, try a glossy cherry-red manicure with tiny black dots and one carefully painted ladybug accent nail on each hand.
Start with a rich, smooth red on most nails. Instead of oversized polka dots, use small, evenly spaced black micro-dots on one or two red nails. Keep another accent nail sheer nude or soft milky pink and paint a miniature ladybug near the cuticle, sidewall, or tip.
The result feels playful without looking childish.
This style works particularly well because it combines several visual levels. From a distance, the manicure reads as a polished red set. Up close, the small ladybug details become the interesting feature.
Micro-sized dots also suit the current preference for small-scale nail artwork on shorter nails. Nail professionals have highlighted tiny dot designs as an effective way to make short natural nails visually interesting without requiring extra length.
For clients with a minimal wardrobe, I would keep the ladybug artwork to one accent nail per hand. Someone with a playful, colorful, or fashion-forward style could add scattered dots to three or four nails.
The finish matters too. High-gloss gel gives the red more depth and makes the black detailing look especially crisp. If you prefer something softer, a translucent red jelly base can make the manicure feel lighter and more contemporary.
This design suits a wide age range because the scale of the artwork can be adjusted. Teen clients may enjoy a slightly more animated ladybug, while adults who prefer understated nail art often respond better to a miniature insect paired with a polished red manicure.
Tip: Ask for small, controlled dots rather than oversized circles if you want the manicure to look sophisticated and balanced.
Best for: Clients who enjoy playful details but still want a manicure that works with everyday clothes, office outfits, casual weekends, and seasonal looks.
Nail shape & length: Short squoval, short round, oval, and medium almond nails work especially well. Longer almond nails can also carry the design, but the artwork should be scaled proportionally.
Occasion: Everyday wear, spring and summer manicures, garden parties, casual celebrations, vacations, birthdays, themed events, or simply a cheerful seasonal refresh.
Maintenance level: Low to medium. Flat painted details are easier to maintain than charms or raised 3D art, although chips are more noticeable on highly pigmented red polish.
Pro artists note: Apply the black dots only after the red layer is completely cured or dry. Uneven dot sizes are one of the quickest ways for this design to look unfinished. I prefer using a small dotting tool and varying the placement slightly rather than creating perfectly rigid rows.
Choosing the Right Ladybug Design for Your Nail Length
Nail length should influence how detailed the artwork becomes.
Short Nails
Short nails are excellent for ladybug manicures.
Rather than trying to fit a full insect illustration on every nail, use tiny dots, half-ladybugs emerging from a sidewall, or one miniature accent.
A round or squoval shape keeps the manicure comfortable and practical.
Short nail art is particularly relevant right now, with modern designs increasingly focusing on tiny details, micro-French techniques, and scaled-down motifs rather than requiring extensions.
Medium Nails
Medium oval and almond nails provide enough room for more deliberate artwork without becoming difficult to maintain.
This length is often my preferred salon option because there is enough surface area for detail while still being comfortable for everyday activities.
Long Nails
Long almond, coffin, and stiletto nails can support elaborate ladybug artwork, but restraint still improves the final look.
Instead of filling all ten nails, consider leaving some nails solid red or sheer.
Negative space makes detailed artwork look more intentional.
How to Make Ladybug Nails Look Expensive Instead of Childlike
Theme-based nail art can easily become visually crowded.
The easiest solution is editing.
Choose two or three visual elements rather than trying to use every possible ladybug reference at once.
For example:
red + black dots + one ladybug
is usually more elegant than:
red + dots + ladybugs + flowers + leaves + glitter + gems + charms.
Precision also matters.
Fine outlines, evenly shaped dots, smooth cuticle application, and a glossy finish will make even a playful manicure look professional.
This is where salon execution often makes the biggest difference.
Matte or Glossy Ladybug Nails?
Glossy would be my first recommendation.
A high-shine top coat makes red appear richer and gives simple black detailing a clean graphic quality.
Matte ladybug nails can look interesting, particularly with deep burgundy or muted red, but matte finishes tend to reveal surface imperfections more easily.
They can also become visibly marked or worn faster depending on the product and the client’s routine.
If you want texture without committing to a fully matte set, consider keeping the red nails glossy and using one matte accent.
Gel, Regular Polish, or Extensions?
The best option depends on how long you want the manicure to last.
Regular Polish
Regular polish works well for a temporary ladybug manicure.
It is ideal if you enjoy changing colors frequently or only need the design for a weekend or event.
The tradeoff is that tips can chip sooner, especially with a strong red shade.
Gel Polish
Gel is my preferred option for detailed flat ladybug artwork.
The design can be cured between stages, which gives the artist more control over tiny dots, outlines, and miniature illustrations.
It also typically maintains gloss better during normal wear.
Builder Gel or Extensions
Builder gel, structured manicures, or extensions make sense when the client needs added strength, length, or shape correction.
They are not necessary simply because the design contains nail art.
Avoid adding unnecessary length if your lifestyle does not support it.
Nail Care Tips for Longer-Lasting Ladybug Nail Art
Beautiful artwork will not compensate for neglected nail preparation.
Before application, the nail plate should be properly prepared and the cuticle area carefully cleaned without damaging surrounding skin.
After your manicure, use cuticle oil regularly.
Oil helps keep the skin around the nails flexible and improves the overall appearance of the manicure as it grows out.
Wear gloves when doing prolonged cleaning or washing dishes. Repeated exposure to water and cleaning products can contribute to lifting, peeling, and premature wear.
Do not use your nails as tools for opening cans, scraping labels, or separating hard objects.
Highly pigmented red polish also makes tip wear easy to spot, so gentle handling matters if you want the manicure to stay polished.
What to Expect as Ladybug Nails Grow Out
Growth is one of the most overlooked parts of choosing nail art.
If your manicure has red polish painted directly to the cuticle, regrowth becomes visible more quickly.
For clients who want a softer grow-out, I recommend placing the ladybug artwork over a sheer nude base and concentrating red details toward the middle or tip.
Negative-space designs can often look presentable for longer because the natural nail growth blends more easily into the original design.
If you wear gel or enhancements continuously, follow the maintenance schedule recommended by your nail professional rather than attempting to peel the product away.
Peeling gel can remove surface layers from the natural nail.
How to Choose a Ladybug Manicure You Will Actually Enjoy Wearing
Save inspiration photos, but look beyond the artwork itself.
Ask yourself whether you like the nail length, base color, finish, amount of detail, and overall contrast.
A manicure can feature a beautiful ladybug illustration and still be wrong for you if you dislike bright red nails.
For a subtle result, choose sheer nude with one tiny ladybug.
For a classic result, choose glossy cherry red and black dots.
For something slightly more sophisticated, try deep cherry or burgundy with very minimal black detailing.
For a playful manicure, increase the number of dots or use a few additional miniature ladybugs.
Your best design is the version that fits both your personal style and your everyday routine.
FAQs About Ladybug Nail Ideas
Are ladybug nails suitable for short nails?
Yes. In fact, short round and squoval nails are among my favorite shapes for this design. Tiny dots and miniature accent artwork work extremely well on a smaller nail plate. You do not need long extensions to make ladybug nail art recognizable.
Do ladybug nails have to be bright red?
No. Cherry red is traditional, but deeper burgundy, coral-red, translucent jelly red, muted tomato, or even a sheer nude manicure with tiny red ladybugs can work beautifully.
Choose the shade based on your skin undertone, wardrobe, and how bold you want the manicure to feel.
Can ladybug nails look professional enough for work?
Absolutely, provided the artwork is controlled.
For a more workplace-friendly version, I would recommend short nails, a sheer neutral base, one miniature ladybug accent per hand, and minimal black dots.
The theme remains visible without dominating the manicure.
How long can ladybug nail art last?
Longevity depends more on the manicure system and your nail habits than the design itself.
Regular polish may begin showing wear within several days, while properly applied gel usually offers longer-lasting color and detailing. Nail growth will gradually create a visible gap near the cuticle regardless of the product.
Should every nail have a ladybug design?
Usually, no.
From a professional design perspective, repeating detailed ladybugs across all ten nails can overwhelm the manicure. One or two accent nails combined with solid red, negative space, or delicate dots creates a cleaner and often more expensive-looking result.
Final Thoughts
Ladybug Nail Ideas work best when the playful theme is paired with polished execution. A controlled red palette, crisp black micro-dots, thoughtful negative space, and one beautifully painted accent can turn a familiar motif into a genuinely stylish manicure.
You also do not need long nails or elaborate extensions to wear the look successfully. Short natural nails can carry miniature ladybug details beautifully, while medium almond or oval nails provide extra space for refined artwork.
When choosing your version, prioritize wearability as much as appearance. Consider your nail length, daily routine, preferred red undertone, maintenance tolerance, and how noticeable you want the design to be.
The most successful ladybug manicure is not necessarily the most complicated one. In the salon, clean placement, balanced detail, healthy nail preparation, and a design that genuinely suits the client almost always create the strongest finished result.